
How to Create a Business Email Address for Free in 3 Easy Steps
Have you been trying to create a domain email address and find the process cumbersome and/or the service unreliable?
Have you had difficulties doing it for free or at a low cost while still having all the basic features anyone needs like the ability to use any mail app?
Well, you’re not alone! I have experienced this too, like many others. As it turns out, many domain email service are not so easy to use, and get expensive fast. Fortunately, there exist a few good solutions.
In this guide, I’ll show you how to create business email addresses for free in 3 simple steps, using postale.io and its free trial. It’ll take you less than 5 minutes.
For this you need to own a domain name. You don’t? Hop to freenom.com to get one for free. Or go get one from any other domain provider of your choice (Namecheap, GoDaddy, …).
In this guide we’ll use the domain myshinynewdomain.com from Namecheap.
Step 1: Register an Account [10 seconds]
That one is super easy. Just go to postale.io and fill in the two fields form at the top of the page.
In the left field, put the first business address you want, and in the right field put an existing personal email address which will be used as a recovery email.

I’ll go with info@myshinynewdomain.com and mygmailaddress@gmail.com respectively (spoiler alert: not my actual gmail address). Now click the Create my domain email button.
Step 2: Set Your Domain MX Record [2 minutes]
TL;DR
Login to your domain provider website and copy/paste the given DNS records to your domain DNS, then return to the postal.io tab and click the Verify my MX record button at the bottom.
Oh my, the address has been created, just like that!

Wait a minute…Oh right, it’s not working yet. A last step is required: configure the domain DNS. « What the heck is that », you ask?
The DNS (Domain Name System) holds the configuration of your domain. Stuff like it’s IP address, its mail service, and so on. We talk about DNS “records” because each setting is actually a textual record in the DNS. More on DNS records here.
« Why do I need to configure it », you then ask? Well, your domain doesn’t know yet which mail service you want it to use, that’s why. You need to set the “MX” (Mail Exchange) record of your DNS. That record tells what mail service your domain is using.
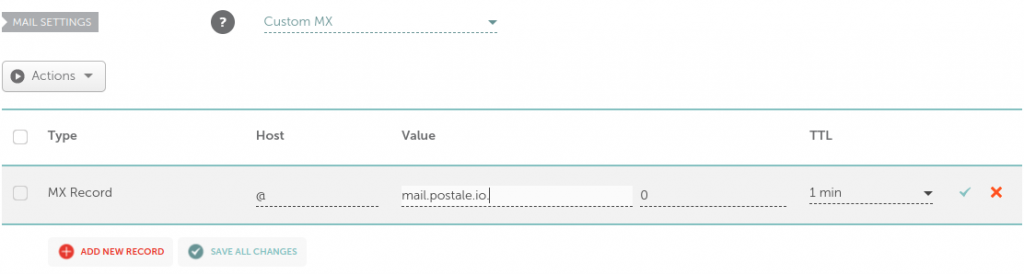
« Ok ok » you say, « Where do I set this MX record thing? ». You do that on your domain provider website. Go there in a new tab, login to your account, and find the DNS editor/manager for your domain.
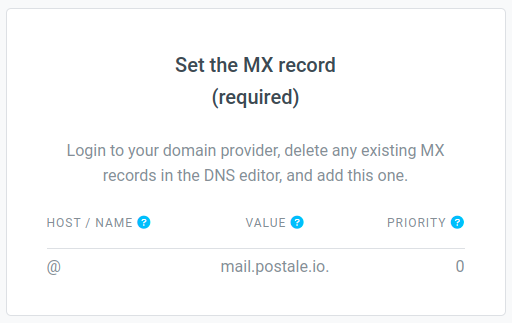
Are you there? Ok, now, delete any existing MX record, and add a new one with the following parameters:
- Host / Name: leave that empty, or if that’s not allowed, put an arobase
@. - Value: put
mail.postale.io.. - Priority: put either zero (
0), or if that’s not allowed, the lowest value allowed (it could be10for instance). - TTL: put the lowest value allowed (often that’s
300).
To help you, here’s a quick list of DNS guides for the most common domain providers out there. In my case, the domain provider is Namecheap.
Want to better understand that step? Have a look at our post The MX Record Explained. Too long? I get it. Basically:
- The empty/arobase host designates your root domain name (as opposed to a subdomain).
- The
mail.postale.io.value designates postale.io’s mail servers. - The lowest priority value actually tells this record is the first MX record to matter, in case you’d have multiple MX records (not recommended).
- The TTL (Time To Live) value tells how many seconds it takes before your changes get propagated over the Internet.
The TXT records
While the MX record is the only one required, others are recommended, especially the SPF, DKIM, and DMARC TXT records. You should copy/paste these records to your DNS as well. They will improve your deliverability and help protect your domain email addresses against abusers.
Step 3: Verify Your Account and Enjoy [1 second]
Got your MX record in place? Phew! You can rest now, we’re basically done.
Easiest step: get back on postale.io’s DNS configuration page, scroll to the bottom and click on the Verify my MX record button.

The verification succeeds, and « voilà », you now have a working business email address. Congrats!

Note
In case the verification failed, you got a message detailing the error under the verification button. Either your DNS changes haven’t propagated yet, or the MX record isn’t correctly set. Have a look here to see how you can check your DNS.
What now? Well, to start sending and receiving with your shiny new business email, simply login to the webmail with the password you’ve just been given.
Want to use another mail app? No problem, add your business email address to your favorite app with the settings given here.
Want to create more email addresses for that domain? Way ahead of you! 👇
Bonus Step: Create More Email Addresses [10 seconds]
Login to the admin interface (same password as for the webmail), click on the Create mailbox button, fill in the address and password, and validate.
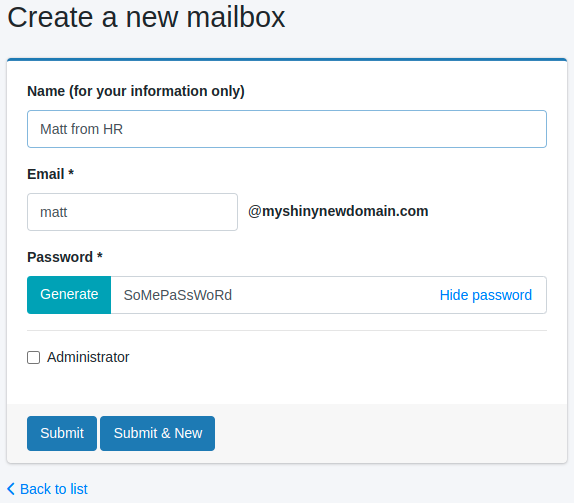
Yep, that’s it. The new address is working right away, you can use it instantly from the webmail or any other mail app. 🎉
More Needs? We Got You Covered
Want email aliases? Need to set automated email copies or forwards, auto replies, or some custom filtering perhaps? Want more storage, more mailboxes, maybe even business addresses for multiple domains?
All of that is covered in the admin interface. Have a go at it, navigate its pages and options, everything should be pretty intuitive and self explanatory.
You’ll find a lot more information in the FAQ and in other blog posts. You can also contact the support for any questions.
Related Posts
-

DNS Records Explained
What Are DNS Records If you own a domain name, you may have heard about DNS records. You may have even had to modify or create some. Let’s understand what these DNS records are all about. A DNS record is a piece of text served by a DNS (Domain Name System) server and providing some…
-
The MX Record Explained
What Is an MX Record Did you have to set your domain MX record at some point when creating a business email address but didn’t understand it well? In this post we’ll explain what an MX record is and how to set it up. The MX record is a type of DNS record. Don’t know…