
3 Easy Ways to Migrate Business Email Addresses Between Services
Performing a migration between email services is often a source of pain and frustration, especially for business owners.
Some mail providers provide custom built migration tools, but that’s not always the case; Or these tool may not support migrating from any mail service, or may not work as intended. And when no such tool is included, many people understandably don’t know where to start.

This is mostly simply due to a lack of good guidance though. In reality, migrating emails doesn’t have to be difficult.
In this post we’ll show you 3 easy ways to migrate your business email addresses between any email services, using only standard tools.
The Prerequisite of Any Email Migration
Recreate Your Email Addresses on the New Service
In a migration what you want to do is recreate all of your email addresses on the new service, along with all their folders and emails.
This is a two steps process: first you recreate the email addresses on the new service, and then you proceed to copying their respective content from one service to the other.
Ideally you want to do that before switching services. So that during the process your email addresses still work without disturbance.
Only once you’re done copying everything will you really switch to the new service, by updating your domain MX record to the new service prescribed value.
Therefore, a prerequisite to your migration is that you recreate your email addresses on the new service.
An Example With postale.io
The way to do that is unique to each mail service. In this guide we’ll use postale.io as an example.
If you don’t have an account already, register one from the homepage two fields form (the first domain address you choose is the admin one, you can change that later if needed).
On the next step, you’re asked to set your MX record and to verify it. Don’t do that! We’re not ready to switch services yet. Instead, use the alternative option to verify the account using a TXT record.
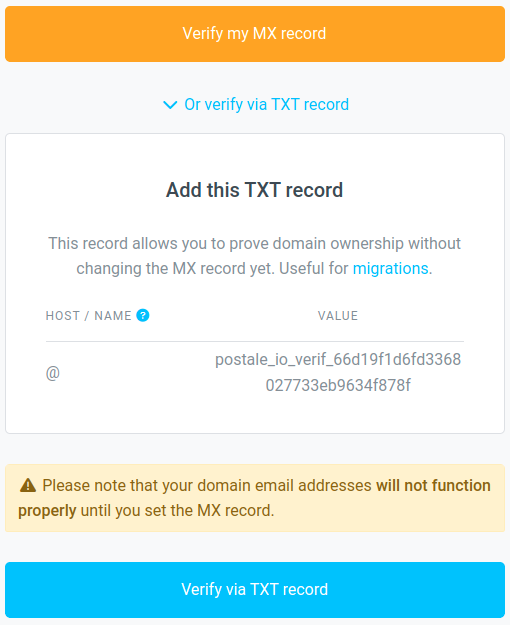
Create a TXT record on your domain DNS as instructed, and click the Verify via TXT record button.
Done? All right, now we can recreate all the other email addresses. Login to the admin interface and click on the Create mailbox button. Fill in the username and password, click on Submit & New and repeat for each address.
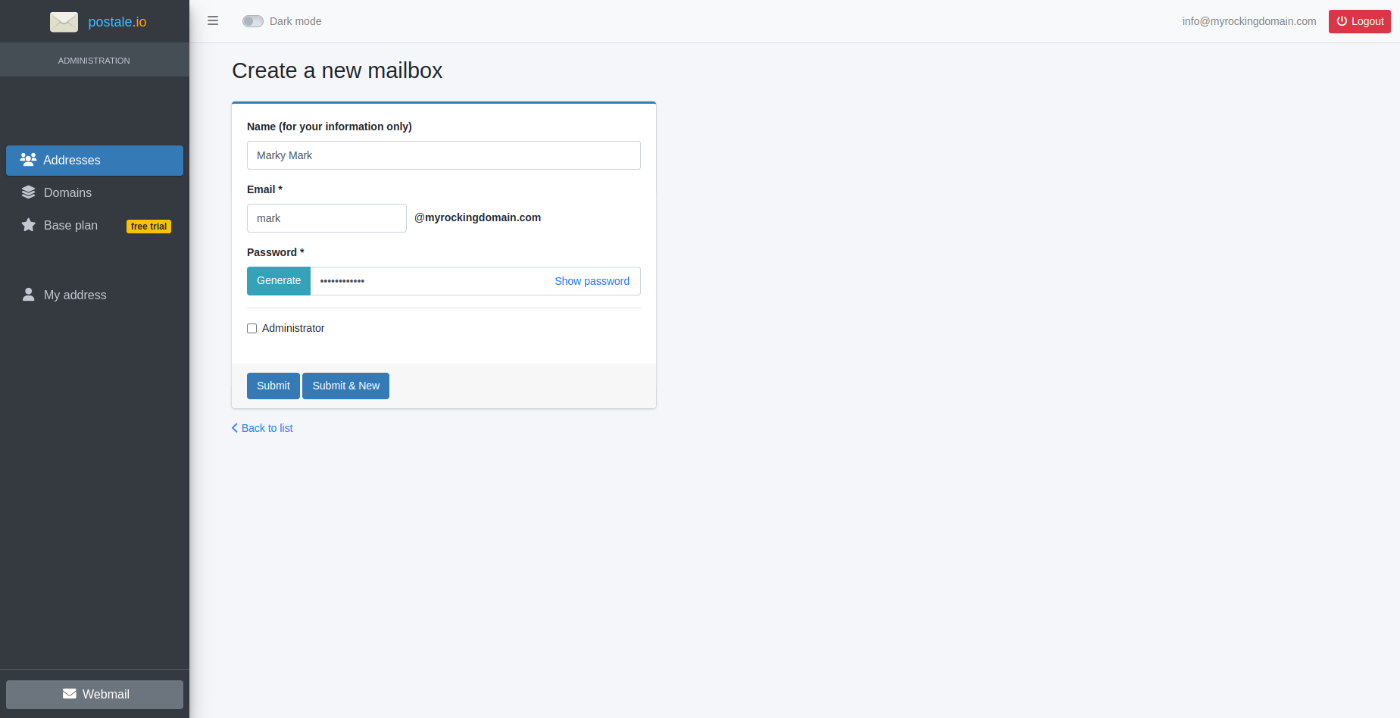
If you manage a lot of addresses and if your plan allows it, you can alternatively use the API to automate the creation process with a script.
Note
Since you haven’t changed your MX record, these addresses on the new mail service don’t actually work yet (except if you send/receive internally between them from a webmail). This is on purpose, so that your existing addresses on your current email service still work undisturbed.
Done? Okay, now we can move on to copying folders and emails. Choose one of the methods below.
Method 1: Automated Migration With Imapsync
Imapsync is a fantastic tool for migrations, and it’s the method we recommend. It’s free, open-source, widely used, and straightforward.
It comes in two flavors, depending on your skills and preferences. The first one is an online graphical tool. This is by far the easiest way you can migrate your business emails, and it’s free for mailboxes under 3GB.
The second flavor is slightly more technical, but is free without limit and has many more options. If you’re familiar with the command line that version is actually also very easy to use.
Requirement
As its name suggests, imapsync uses the IMAP protocol, which means it only works if your current and new email services have IMAP enabled. In some rare instances that may not be the case (for instance in Zoho’s free plan).
The Online Graphical Version
The online version of imapsync is incredibly straightforward. Your simply fill in for each service (source and destination):
- The email address/username.
- Its password.
- The IMAP server hostname.
Uncheck “Just verbose, no real sync”, click the Sync or resync button, and…That’s it! Imapsync copies all the folders and emails from the source mailbox to the destination one.
Here’s an example migrating a mailbox from Zoho to postale.io (if you’re also migrating from Zoho your IMAP host may differ):

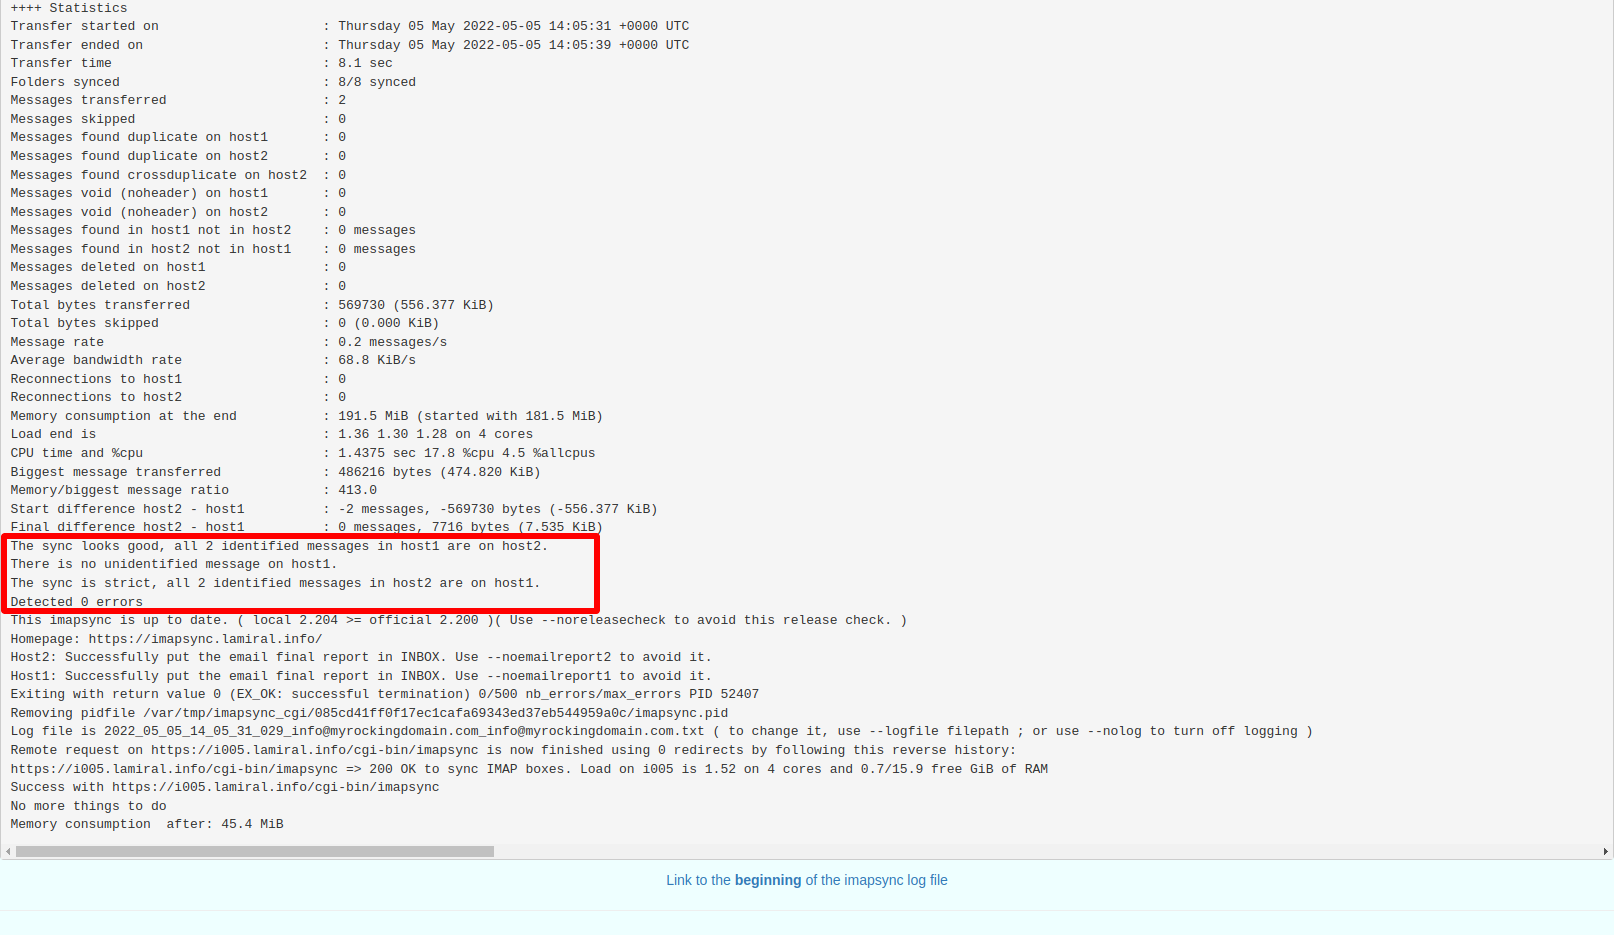
Scroll down to see logs informing you on the progress and outcome. You can abort at any time via the abort button. In case of failure, check out the logs. A common mistake is wrong usernames and/or passwords.
There are a few more options available. For instance you can copy only a specific folder (Show / Hide extra parameters > Sub-folder).
Tip
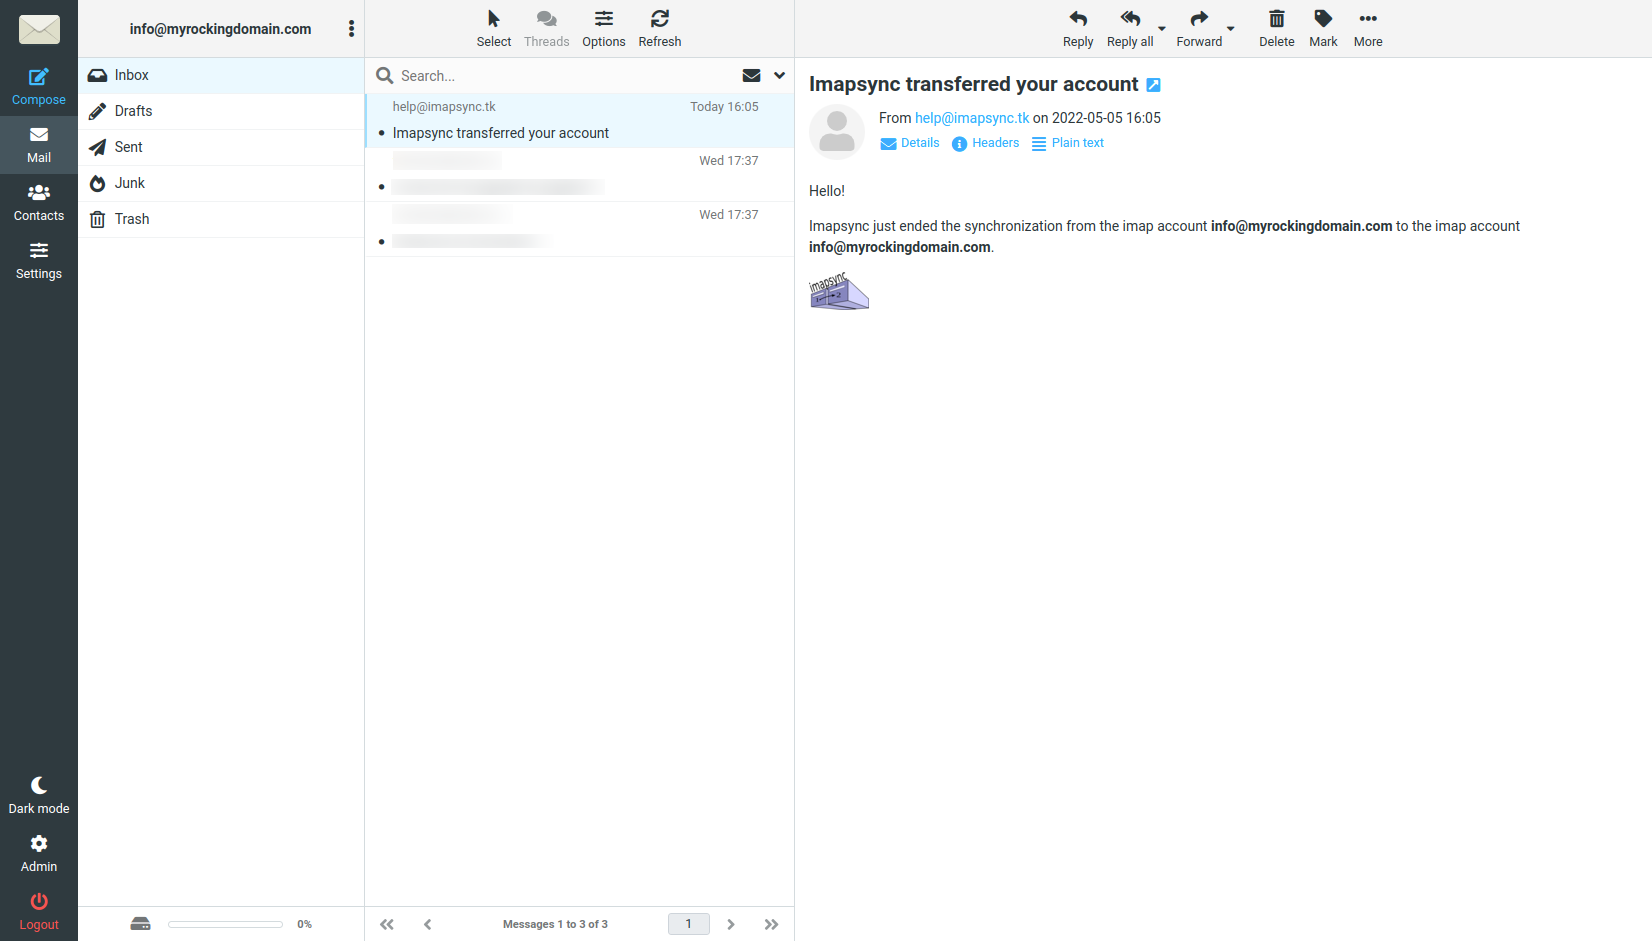
After imapsync has finished, you may need to close and reopen your mail client or refresh your webmail page in order to see all the changes, especially if new folders were created on the destination mailbox.
As mentioned earlier, the online version is free for mailboxes under 3GB. If you need to migrate larger mailboxes, you can either pay or use the command line version of imapsync, which isn’t limited.
If you manage many addresses the command line tool also enables you to automate the process in a script.
Security
If you use the online version, we recommend that you change the mailbox password afterwards, for added safety.
The Command Line Version
You can find the command line version on its GitHub repository. The usage documentation is in the README file, and you can find a lot more on imapsync’s website: imapsync.lamiral.info.
Installation varies depending on your OS. In this example we’re using Ubuntu (Linux) and all we have to do is download the “imapsync” Perl script from the repository:
peter@home:~$ wget https://raw.githubusercontent.com/imapsync/imapsync/master/imapsync
peter@home:~$ chmod +x imapsync && sudo mv imapsync /usr/bin/
We’ll migrate a mailbox info@myrockingdomain.com from Zoho to postale.io (if you’re also migrating from Zoho your IMAP host may differ):
peter@home:~$ imapsync \
--host1 imappro.zoho.eu \
--user1 info@myrockingdomain.com \
--password1 password \
--host2 mail.postale.io \
--user2 info@myrockingdomain.com \
--password2 password
[...]
Time spent on sizing:         2.6 seconds
++++ Statistics
Transfer started on                     : jeudi  5 mai 2022-05-05 16:21:24 +0200 CEST
Transfer ended on                       : jeudi  5 mai 2022-05-05 16:21:37 +0200 CEST
Transfer time                           : 13.1 sec
Folders synced                          : 8/8 synced
Messages transferred                    : 2
Messages skipped                        : 0
Messages found duplicate on host1       : 0
Messages found duplicate on host2       : 0
Messages found crossduplicate on host2  : 0
Messages void (noheader) on host1       : 0
Messages void (noheader) on host2       : 0
Messages found in host1 not in host2    : 0 messages
Messages found in host2 not in host1    : 0 messages
Messages deleted on host1               : 0
Messages deleted on host2               : 0
Total bytes transferred                 : 569730 (556.377 KiB)
Total bytes skipped                     : 0 (0.000 KiB)
Message rate                            : 0.2 messages/s
Average bandwidth rate                  : 42.6 KiB/s
Reconnections to host1                  : 0
Reconnections to host2                  : 0
Memory consumption at the end           : 183.8 MiB (started with 166.9 MiB)
Load end is                             : 1.88 1.38 1.40 1/3390 on 8 cores
CPU time and %cpu                       : 0.8 sec 6.1 %cpu 0.8 %allcpus
Biggest message transferred             : 486216 bytes (474.820 KiB)
Memory/biggest message ratio            : 396.3
Start difference host2 - host1          : -2 messages, -569730 bytes (-556.377 KiB)
Final difference host2 - host1          : 0 messages, 7716 bytes (7.535 KiB)
The sync looks good, all 2 identified messages in host1 are on host2.
There is no unidentified message on host1.
The sync is strict, all 2 identified messages in host2 are on host1.
Detected 0 errors

Check if a new imapsync release is available by adding --releasecheck
Homepage: https://imapsync.lamiral.info/
Exiting with return value 0 (EX_OK: successful termination) 0/50 nb_errors/max_errors PID 4139681
Removing pidfile /tmp/imapsync.pid
Log file is LOG_imapsync/2022_05_05_16_21_24_228_info@myrockingdomain.com_info@myrockingdomain.com.txt ( to change it, use --logfile filepath ; or use --nolog to turn off logging )
Pretty neat, right?
That command attempts to fully replicate all folders and emails. If you need finer control, there are many options available, like copy only some folders or emails based on various criteria (size, age, …).
Tip
After imapsync has finished, you may need to close and reopen your mail client or refresh your webmail page in order to see all the changes, especially if new folders were created on the destination mailbox.
Method 2: Manual Migration With Export/Import
Manual migrations require a little more work, but can be very handy if you manage a small number of addresses with little data.
Here we’ll exploit the common ability of email services to export mailbox folders into archives, and to import archives into mailboxes.
Alternative
If your source or target email service doesn’t offer exports or imports, that ability is also often found in mail apps (Outlook, Thunderbird, …).
The procedure is pretty straightforward. For each address:
- From your current mail service, export folders into archives.
- From your new mail service, import these archives.
In our Zoho to postale.io migration example, that translates to:
- Export from Zoho Mail > Settings > Import/Export emails.
- Import to postale.io’s webmail > More > Import.

There are two main email export formats widely used: MBOX and EML (a.k.a MIME).
The former is a single “.mbox” file aggregating multiple emails, whereas the latter takes the form of one “.eml” file per email. Both are usually compressed into a “.zip” archive (with the archive containing multiple files in the case of EML).
Other less common formats like Outlook’s PST files can usually be converted to MBOX or EML with specialized converters (for instance here).
Tip
If the target service limits the import archive size below your archive size, you can split the archive into multiple smaller ones.
Method 3: Manual Migration With Local Copy
Another super easy way to manually migrate emails can be achieved with some mail clients.
The method consists in adding both the source and the target mailboxes to the app, and then simply copy emails from one mailbox to the other.
Since both the source and target mailboxes have the same email address, this only works on mail clients able to have multiple mailboxes of the same address simultaneously.
Thunderbird is such a client, with the added advantage of being free. We’ll use it as an example here.
Gather the IMAP and SMTP settings for your current and new mail service, and add your address from each service to the mail client.
Now, select emails in the current service mailbox and copy them to the new service mailbox. On Thunderbird that’s done via right click > Copy To > target mailbox > target folder.
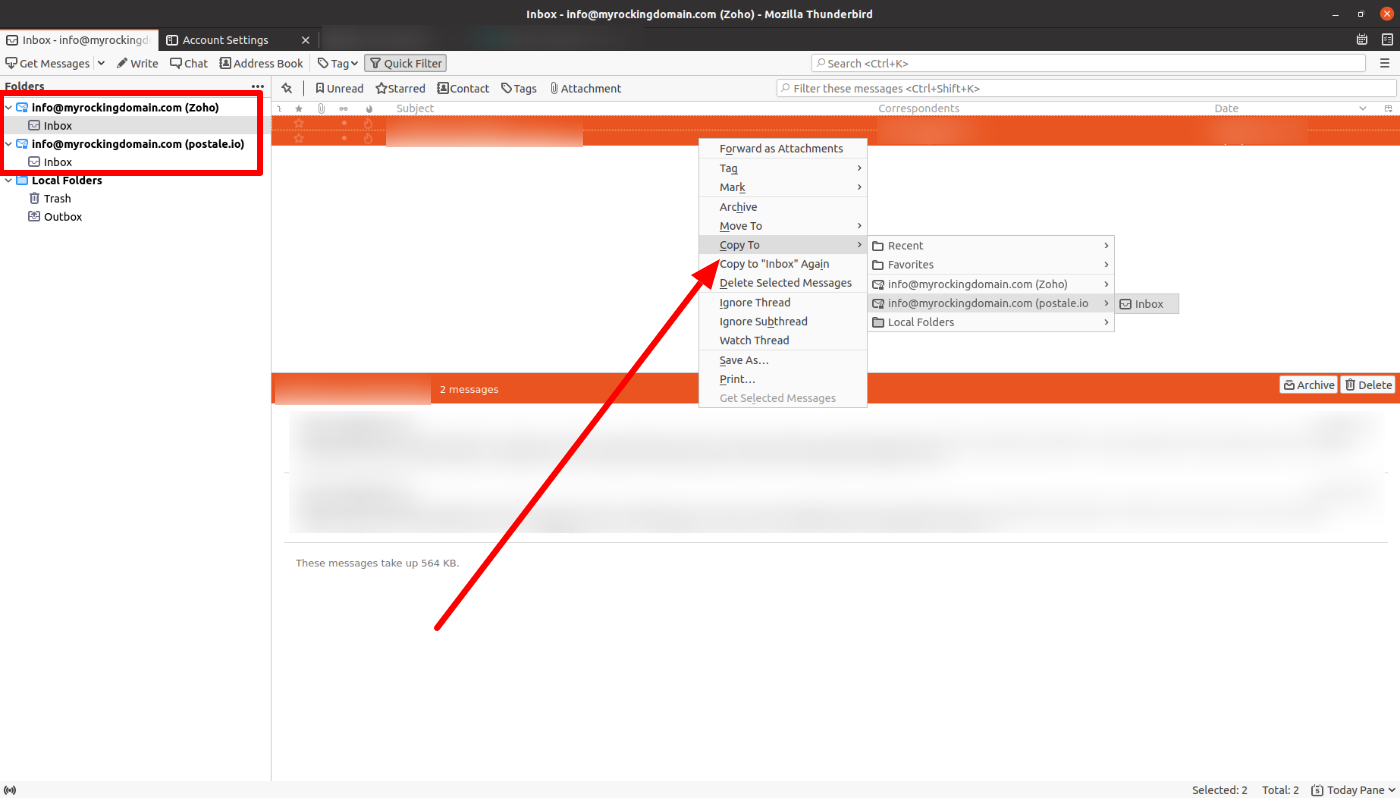
Repeat the process for each address, and you’re done!
Switching Services
Okay, you’ve chosen one of the methods above and copied the emails of all of your domain addresses from your current email service to the new one.
You are now ready to switch services. That’s done by changing your domain MX record. In our postale.io example that means setting your MX record to mail.postale.io..
Ideally, you also want to update your SPF, DKIM, and DMARC records. Follow the instructions of your new mail provider (here for postale.io).
Depending on your TTL setting for the MX record, your change may take from a minute to a day to propagate. Typical time frames are no more than a few hours though, ofen just a few minutes.
Nothing will break during DNS propagation, but incoming emails may arrive at your addresses either on your current email service or on the new one, depending on whether the change has reached the sender.
You can follow the propagation one websites like whatsmydns.net. Once it’s done, you’ve switched services!
Copy New Emails Received During the Process
During the process of copying emails from one service to the other and switching services, your business email addresses on the previous service may have received new emails, especially if the process took a long time.
That’s ok! You can simply redo your favorite email copy method for these emails.
Since you’ve already copied everything not long ago, you won’t have many new emails to copy, so it won’t take you long.
If you use imapsync, that’s really easy: just re-run it, it will only copy emails not already in the destination mailbox.
Cleaning Up
At this point you have completely switched services, and all your folders and emails are present on your new email service.
You can safely terminate your account with your previous email service!

Over to You
Hopefully you have learned in this guide how to perform a smooth email migration without too much difficulty. What method will you choose? Did we miss any? Let us know!
Related Posts
-
The MX Record Explained
What Is an MX Record Did you have to set your domain MX record at some point when creating a business email address but didn’t understand it well? In this post we’ll explain what an MX record is and how to set it up. The MX record is a type of DNS record. Don’t know…
-

The postale.io Alternative to The Discontinued G Suite Legacy Free Edition
Google recently announced they would soon put a stop to their G Suite legacy free edition, initially created when they stopped offering free G Suite accounts back in 2012. Users of that edition are thus faced with the choice of either upgrading to Google Workspace or leave to another domain email provider. This has left…